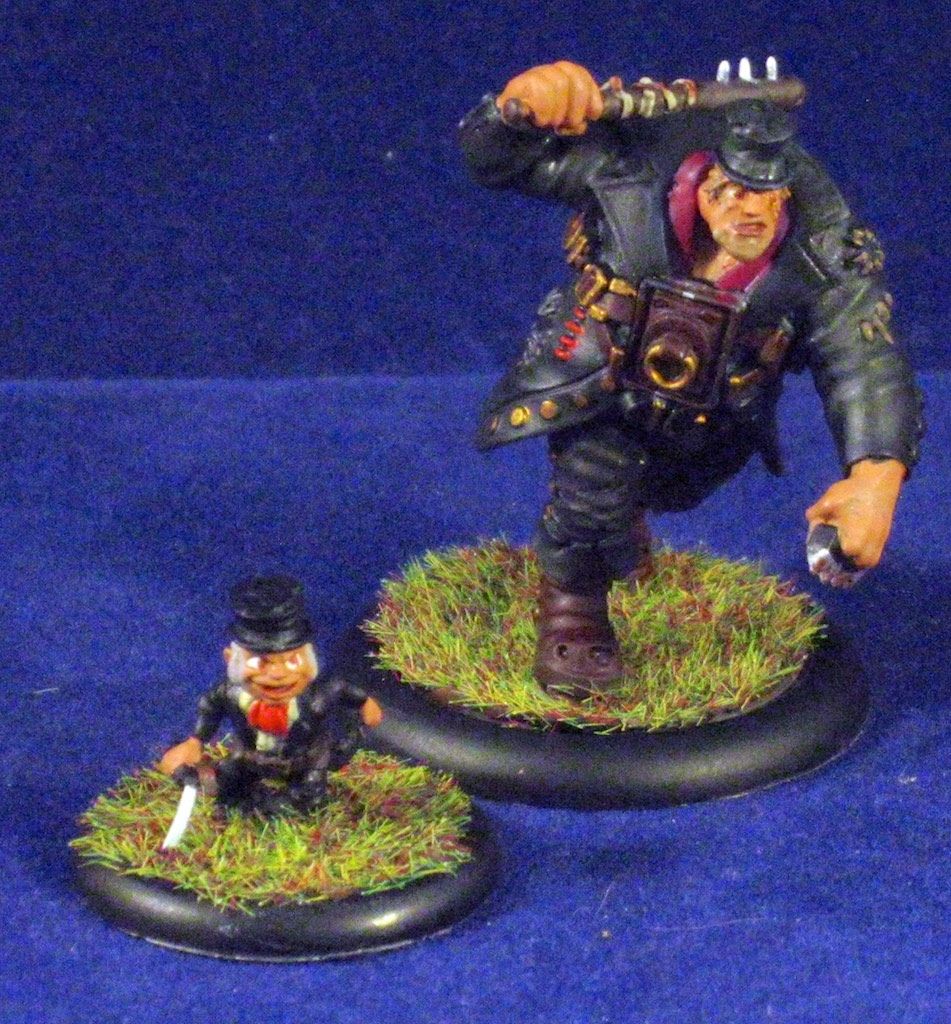
Don't those two look familiar?
I've been playing in a number of Guild Ball tournaments this year. I've tucked a total of 8 under my belt since January, averaging a bit more than 1 per month. In between those events I've also run 3 tournaments including the (to date) largest tournament in the US. The Guild Ball tournament scene is maturing in a very short time and trends are starting to emerge. One of those trends I've found myself partaking in, despite my annoyance. Avarisse and Greede have been showing up in more tournament teams with each passing event. This has to make one wonder what this player (these players?) do so well that they make it in so many lists.Avarisse & Greede
Avarisse & Greede are a single player choice for a team roster who bring potential two players to the table. Through a unique ability called Detach on Avarisse a second player can be put on the table during a maintenance phase, making this player into two different models. Once detached Greede acts on his own and generates his own influence. Should you want to recombine them Greede has the Attach ability to combine the two players back together.
Starting with Avarisse we look at his card and see a typical big guy stat line with 20 health and a 3+/1 defense and armor combined with Tough Hide on the back of his card. We also see a single influence, but this is off set by detaching Greede for a second influence (while detached). A movement of 4 inches is not overly impressive, but the jump to 7 inches on the sprint/charge becomes respectable. Combined with his TAC of 6 we see a model that really wants to be charging.
 Avarisse shines when you look closely at his playbook. The majority of his playbook is momentous and it's easy to focus on the top end results with both damage and double pushes. Considering he has a short playbook (TAC 6 playbook 5 long) this seems really good, but it's not the strength of the playbook. Non-momentous knockdown on 2 successes is really good when it comes to counter-attacks. Momentous Singled-Out is the gem of this playbook though. Adding 2 additional TAC to other models who attack the target is an amazing ability. This can really increase the effectiveness of other playbook plays and triggered character plays.
 Switching to the smaller of the pair we take a look at Greede. First we should focus on the very impressive 5+ natural defense on his card. This spikes up to 6+ when he is within 4 inches of Avarisse. Overall Greede is slow with a relatively low TAC, a very low health of 4, and Crazy to increase his TAC. This means that his playbook is very long to match his Crazy triggered TAC of 8. Greede, who is already vulnerable to taking a hit during a counter attack, becomes even more fragile if you use Crazy to get decent attacks. It's unfortunate that there are so few decent momentous results on his playbook, making the choice to attack with him not one of the better choices. Along with his defense Greede's kick stat really stands out on his card. A 4/4" kick makes him very reliable kicking, but only over a short distance.
What's the big deal?
Sure, knockdown, pushes, and Singled Out are all good plays. Sure, Avarisse is a big guy with lots of health and tough hide. Is that enough to see them showing up in most tournament lists? Are people truly making incredible use of a 4/4" kick to get those crazy snap-shots? I'm fairly certain that none of this is the reason. The reason these are being added into so many lists is for the extra activation. Activation control in Guild Ball may not be as important as other games, but it can be critical in the early turns for specific game plans.Typically use for Avarisse & Greede runs in a similar fashion regardless of the team they are playing on. During the first maintenance phase Avarisse uses Detatch to offload Greede onto the table behind him, typically in range of the friendly goal. Avarisse may get an influence or not, and at some point during the turn he trundles up the board toward mid-field. During the turn Greede will move back within an inch of the friendly goal and hide there for the bulk of the game.
The usefulness here is to force use the extra activation to force your opponent to commit to their game plan and move up the board before you have to commit. This can give an advantage to any team who's plan benefits from taking the last activation or an uninterrupted final activation. Any Shock & Awe style game plan almost requires A&G on the team to assure maximum effectiveness.
Condition play focused teams such as Smoke led Alchemists, Alchemists teams with Venin, Hunters, and Fillet led butchers all make use of out-activating their opponents. Forcing conditions that cannot be removed before the end of the turn converts immediately to near guaranteed damage. Combining this with heavy momentum generation can deliver a devastating combo hit to a team as the conditions wear them down lining up multiple early turn take-outs.
First turn aggressive scoring focus teams such as Fishermen, Pin Vice led engineers, Masons, and Union or Mortician teams including Mist benefit from the final turn activation. These teams tend to aim for scoring late turn 1 to minimize the ability of an opponent returning a goal during the turn using the goal kick to get the ball down the field. If these teams can capitalize on the goal with initiative on the following turn they can retrieve the ball and possibly convert a second fast goal early on turn 2.
Aggressive take-out focused teams such as Butchers, Brewers, Masons, Morticians, and Union have a trickier time making the most out of the last activation. These teams typically need a way to increase their own threat range or to pull a target model toward them. Gutter and Minx can be great for this, as can Puppet Master (Obulus), Lure (Cosset), and Times Called (Spigot). Take-out plays can be particularly effective utilizing a final activation due to the amount of momentum typically generated. The momentum typically results in grabbing initiative on turn 2, allowing the team to do more damage or complete a take-out in the first activation of turn 2.
Thoughts
I don't like the whole philosophy behind must take characters. Aside from taking Masons I'm seeing A&G being added to lists partly to counter other lists taking A&G. I'm adding A&G to specific lists to compliment my strategies in the early turns. Once I'm into late turn 2 or later I'm using Avarisse to deliver Singled Out onto key targets along with an occasional knockdown. A&G activation control and Singled Out really compliments a Captain Rage led union team just as nicely as any Union team containing Mist.I believe other people are starting to figure out how to use these two, specifically the strength that Avarisse brings with a single success momentous Singled Out. I've talked on Guild Ball Tonight about how I was having trouble figuring out how to use them well. Early on I was not getting a lot of value from the dynamic duo but have begun to learn how to use them over the past couple months. It's entirely feasible that others are following along the same track I am, learning how to use them well in similar timing. I hope this is the case as I'm sometimes seeing A&G in teams I'm not sure are the best fit. I'm still unsure if the extra activation is so strong in play that it needs to be countered. If this is the case it's a sad day for Guild Ball as A&G become must-take models and we'll start seeing team diversity decreases throughout competitive events.


